Marker Shading 101


One of my favorite stamping techniques is how to bring your stamped images to life using marker shading! Today’s post will show you how to get multiple color shades from a single marker.
Step One: stamp your image. If you’re not sure what ink to use, see my tips at the end of this post.

Step Two: color your image using ShinHan™ Touch Twin™ markers. These markers are alcohol based, which makes them ideal for blending.

Step Three: decide where the “light” is coming from. To create a three-dimensional effect, which is what we’re trying to achieve by shading, you must determine where the light and shadows will be. Using the colorless blender, lighten the areas of your image where the light touches it.

Step Four: Re-color shaded areas. Using the same color markers, go over the shaded areas again to darken them.

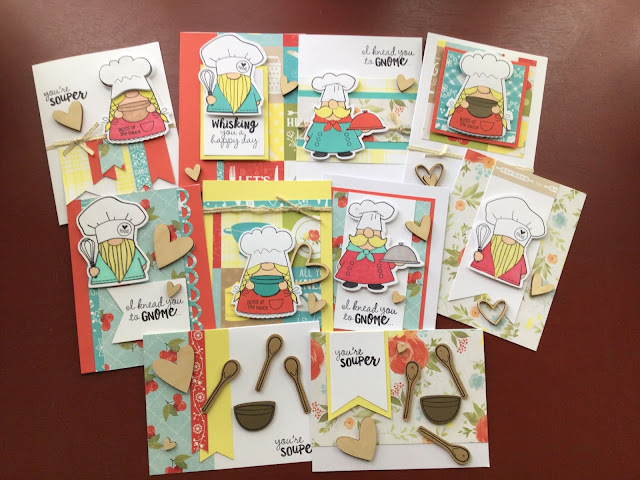
That’s it! Easy-peasy, right?! You can use this technique directly on a scrapbook page, a card base, or to create an original 3-D accent piece like the one on this card.

INK TIPS: The very first thing we have to do, before picking out colors or anything of the sort, is to consider if we are using the correct ink for our stamping. Which is the correct ink? Isn’t black just black? Well, it depends on your stamping surface and what you will use to color in the image. Here’s a quick breakdown for you. Our Black Exclusive Inks™ is best used for images that you will stamp in solid black. Then there’s the Archival Black Exclusive Inks™. We like to use this ink especially in our scrapbooks because it’s colorfast and truly archival. You can add color to Archival Black ink with watercolors or alcohol-based markers, even, but you must make sure it is completely dry before you do so or your image will bleed. Black Memento™ ink is a favorite because it dries quicker than Archival Black and it doesn’t bleed when you add color. We’ve also learned, however, that the Memento™ ink does not work well on vellum paper and Archival Black does. The last one of the bunch that deserves a quick mention is the StazOn™ ink. StazOn™ works well with non-porous surfaces, such as glass, metals, ceramics, etc.
All of the stamped images on today’s post were done with Archival Black ink.
Hope this technique helps you with your stamping projects friends!
XOXO, Shauna
Recipes
3″ x 3″ So Happy for You Card
C1693 My Acrylix® Many Congrats Stamp Set, 1385 White Daisy Cardstock, X5974 Raspberry Cardstock, Z3271 Archival Black Exclusive Inks™ Stamp Pad, Z2457 ShinHan™ Touch Twin™ Marigold Marker, Z2448 ShinHan™ Touch Twin™ Carmine Marker, Z2459 ShinHan™ Touch Twin™ Pastel Green Marker, Z2466 ShinHan™ Touch Twin™ Vivid Green Marker, Z2454 ShinHan™ Touch Twin™ Leaf Green Marker, Z3189 White & Gold Ribbon, Z1263 Bitty Sparkles, Z3274 Clear Sparkles
C1693 My Acrylix® Many Congrats Stamp Set, 1385 White Daisy Cardstock, X5974 Raspberry Cardstock, Z3271 Archival Black Exclusive Inks™ Stamp Pad, Z2457 ShinHan™ Touch Twin™ Marigold Marker, Z2448 ShinHan™ Touch Twin™ Carmine Marker, Z2459 ShinHan™ Touch Twin™ Pastel Green Marker, Z2466 ShinHan™ Touch Twin™ Vivid Green Marker, Z2454 ShinHan™ Touch Twin™ Leaf Green Marker, Z3189 White & Gold Ribbon, Z1263 Bitty Sparkles, Z3274 Clear Sparkles
3″ x 3″ I’m a Big Kid Now Card
Z3373 School Kids Stamp and Thin Cuts, 1385 White Daisy Cardstock, X5960 Fern Cardstock, Z3271 Archival Black Exclusive Inks™ Stamp Pad, Z2448 ShinHan™ Touch Twin™ Carmine Markers, Z2455 ShinHan™ Touch Twin™ Light Orange Marker, Z2451 ShinHan™ Touch Twin™ Clay Marker, Z2456 ShinHan™ Touch Twin™ Mahogany Marker, Z2454 ShinHan™ Touch Twin™ Leaf Green Marker, Z2463 ShinHan™ Touch Twin™ Sap Green Marker, Z2458 ShinHan™ Touch Twin™ Marine Blue Marker, Z2467 ShinHan™ Touch Twin™ Warm Grey 4 Marker, Z1263 Bitty Sparkles, Z2060 Thin 3-D Foam Tape
Z3373 School Kids Stamp and Thin Cuts, 1385 White Daisy Cardstock, X5960 Fern Cardstock, Z3271 Archival Black Exclusive Inks™ Stamp Pad, Z2448 ShinHan™ Touch Twin™ Carmine Markers, Z2455 ShinHan™ Touch Twin™ Light Orange Marker, Z2451 ShinHan™ Touch Twin™ Clay Marker, Z2456 ShinHan™ Touch Twin™ Mahogany Marker, Z2454 ShinHan™ Touch Twin™ Leaf Green Marker, Z2463 ShinHan™ Touch Twin™ Sap Green Marker, Z2458 ShinHan™ Touch Twin™ Marine Blue Marker, Z2467 ShinHan™ Touch Twin™ Warm Grey 4 Marker, Z1263 Bitty Sparkles, Z2060 Thin 3-D Foam Tape
3″ x 3″ Welcome Little One Card
B1558 My Acrylix® Baby Animals Stamp Set, Z3350 Whimsy Fundamental Paper Packet, 1385 White Daisy Cardstock, Z3271 Archival Black Exclusive Inks™ Stamp Pad, Z2461 ShinHan™ Touch Twin™ Peacock Green Marker, Z2451 ShinHan™ Touch Twin™ Clay Marker, Z2459 ShinHan™ Touch Twin™ Pastel Green Marker, Z2452 ShinHan™ Touch Twin™ Golden Yellow Marker, Z1263 Bitty Sparkles, Z3274 Clear Sparkles, Z2060 Thin 3-D Foam Tape
B1558 My Acrylix® Baby Animals Stamp Set, Z3350 Whimsy Fundamental Paper Packet, 1385 White Daisy Cardstock, Z3271 Archival Black Exclusive Inks™ Stamp Pad, Z2461 ShinHan™ Touch Twin™ Peacock Green Marker, Z2451 ShinHan™ Touch Twin™ Clay Marker, Z2459 ShinHan™ Touch Twin™ Pastel Green Marker, Z2452 ShinHan™ Touch Twin™ Golden Yellow Marker, Z1263 Bitty Sparkles, Z3274 Clear Sparkles, Z2060 Thin 3-D Foam Tape
3″ x 3″ Congrats Card
B1558 My Acrylix® Baby Animals Stamp Set, D1747 My Acrylix® Happily Ever After Stamp Set, 1385 White Daisy Cardstock, X5982 Canary Cardstock, Z3271 Archival Black Exclusive Inks™ Stamp Pad, Z2454 ShinHan™ Touch Twin™ Leaf Green Marker, Z2463 ShinHan™ Touch Twin™ Sap Green Marker, Z2459 ShinHan™ Touch Twin™ Pastel Green Marker, Z2452 ShinHan™ Touch Twin™ Golden Yellow Marker, Z2453 ShinHan™ Touch Twin™ Lavender Marker, Z1799 Silver Shimmer Trim, Z1263 Bitty Sparkles, Z3274 Clear Sparkles, Z2060 Thin 3-D Foam Tape
B1558 My Acrylix® Baby Animals Stamp Set, D1747 My Acrylix® Happily Ever After Stamp Set, 1385 White Daisy Cardstock, X5982 Canary Cardstock, Z3271 Archival Black Exclusive Inks™ Stamp Pad, Z2454 ShinHan™ Touch Twin™ Leaf Green Marker, Z2463 ShinHan™ Touch Twin™ Sap Green Marker, Z2459 ShinHan™ Touch Twin™ Pastel Green Marker, Z2452 ShinHan™ Touch Twin™ Golden Yellow Marker, Z2453 ShinHan™ Touch Twin™ Lavender Marker, Z1799 Silver Shimmer Trim, Z1263 Bitty Sparkles, Z3274 Clear Sparkles, Z2060 Thin 3-D Foam Tape

Comments
Post a Comment